Recently I wrote a post about synthetic ice on a general level, and said that I would be writing more about the topic. So, today I want to talk about HockeyShot synthetic ice tiles.
Explore the Options
HockeyShot has two different types of synthetic ice tiles for skating, plus a line of non-skateable tiles that can be used for shooting, stickhandling, and passing practice. For the purposes of this post, we’re only going to look at the two skateable tile options.
Revolution
HockeyShot’s Revolution tiles (pictured here) are 18.5″ x 18.5″ and have puzzle edges to connect together, so after they are connected, each tile works  out to 18″ x 18″ of skateable surface, or 2.25 square feet. The tiles are available in two thicknesses: regular is 7/16″, and premium is 7.5/16″. Other than the thickness and the corresponding difference in expected lifespan, there is no difference between the regular and premium versions of the Revolution tiles.
Extreme Glide
HockeyShot’s other line of skateable tiles is called Extreme Glide. Like the Revolution, these tiles connect with puzzle edges. After they are connected, the Extreme Glide tiles provide a skateable surface of either 4′ x 4′ (16 square feet) for the 3/8″ thickness, or 4′ x 8′ (32 square feet) for the 1/2″ and 3/4″ thicknesses.
Lifespan
For the regular Revolution tiles, the expected lifespan is 3-5 years, while for the premium version it’s 5-7 years. It’s important to note that the Revolution tiles have one skateable side, not two like the Extreme Glide tiles.
For the Extreme Glide tiles, the expected lifespans are as follows:
Residential usage
- 3/8″ tiles: 7-10 years per side
- 1/2″ tiles: 10+ years per side
- 3/4″ tiles: 10+ years per side
Commercial usage
- 3/8″ tiles: 5-7 years per side
- 1/2″ tiles: 7-10 years per side
- 3/4″ tiles: 10+ years per side
Those lifespans are approximate, of course, and will vary depending on how much they are used. The estimates for both the regular and premium Revolution tiles, as well as the residential estimates for the Extreme Glide tiles, are assuming normal usage in a family setting – not several hours a day, every day.
It may seem strange that such a small difference in thickness between the regular and premium Revolution tiles would make such a difference in the longevity of the tiles, but there’s a good explanation for that. As I mentioned above, the Revolution tiles are single-sided. A lot of the thickness of the Revolution tiles is made up of a ribbed support structure that serves three purposes:
- It makes the tiles lighter and easier to install/transport (and reduces shipping costs);
- It gives the tiles some elasticity to allow installation on surfaces that aren’t perfectly flat;
- It allows the tiles to be installed on rough surfaces without having to worry about scratching the other side.
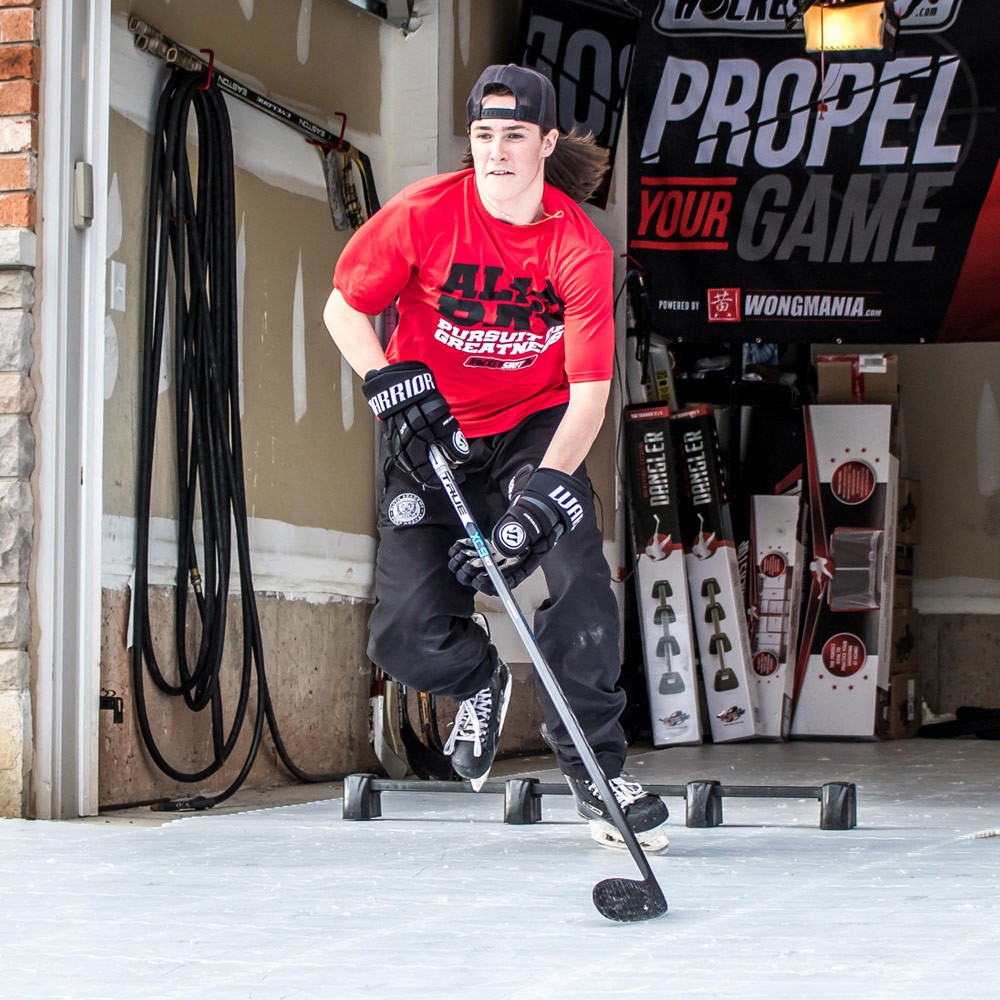
Performance
When it comes to skating, both the Revolution and Extreme Glide tiles have a coefficient of friction that is 10-15% greater than real ice, which in simple terms means that they are less slippery. That is a typical coefficient of friction for synthetic ice nowadays. Of the two, the Extreme Glide tiles are considered the higher end, although this probably has more to do with other factors than a difference in glide. A HockeyShot representative told me there is “virtually no discernible difference” in the coefficient of friction between the two.
There is a difference in the construction, though, and this is probably the main factor in a slightly different feel when skating between the two types of tiles. As I mentioned, the Revolution tiles have a ribbed support structure underneath the surface; by contrast, the Extreme Glide tiles are solid, and have little to no elasticity. This makes them feel a little more natural when skating than the Revolution, which feel a bit hollow. It’s hard to explain that, and it’s not a major difference, but you can feel it if you do a back-to-back comparison.
Since the Extreme Glide tiles are larger, you won’t need as many to get the same total square footage of skating surface as with the Revolution tiles. That could be either a positive or negative for either kind of tile, depending on your  perspective. For any given amount of skating surface, the smaller Revolution tiles will have more connection seams. Since the connection seams are the obvious place where a skating surface might be uneven, having more seams creates more possibility for that.
On the other hand, that is the whole reason why the Revolution tiles are designed with some elasticity – so they can be used on uneven surfaces without the seams popping out. That means a driveway that isn’t completely flat might be a better candidate for the Revolution tiles than the stiffer Extreme Glide tiles.
The advantage of the Extreme Glide tiles on this front is that it’s much more likely that an irregularity in an otherwise level surface could fit entirely under the middle area of a panel, so it doesn’t put pressure on a connection seam. As an example, I have a divot in the concrete floor of my garage; it’s probably 1″ deep, 2-3″ wide, and 12-16″ long. With the Extreme Glide tiles, the divot probably would not be anywhere near a seam, but with the Revolution tiles, it probably would. And even if not, the elasticity in the Revolution tiles means that the tile might flex when skating over the divot, which obviously would not be ideal. Of course, if the Revolution tiles are the preferable option for a customer except for an issue like this, the best option would be to fill in the divot to make the floor level.
Installation and Maintenance
When it comes to installation, the Revolution tiles really can’t be beat. They’re very light (2.2 lbs per tile), so one person can carry them easily. No special tools are needed for assembly, just a rubber mallet to connect the tiles.
The Extreme Glide tiles (pictured here) are relatively easy to assemble as well. The big difference is that the tiles are larger and heavier, so two people 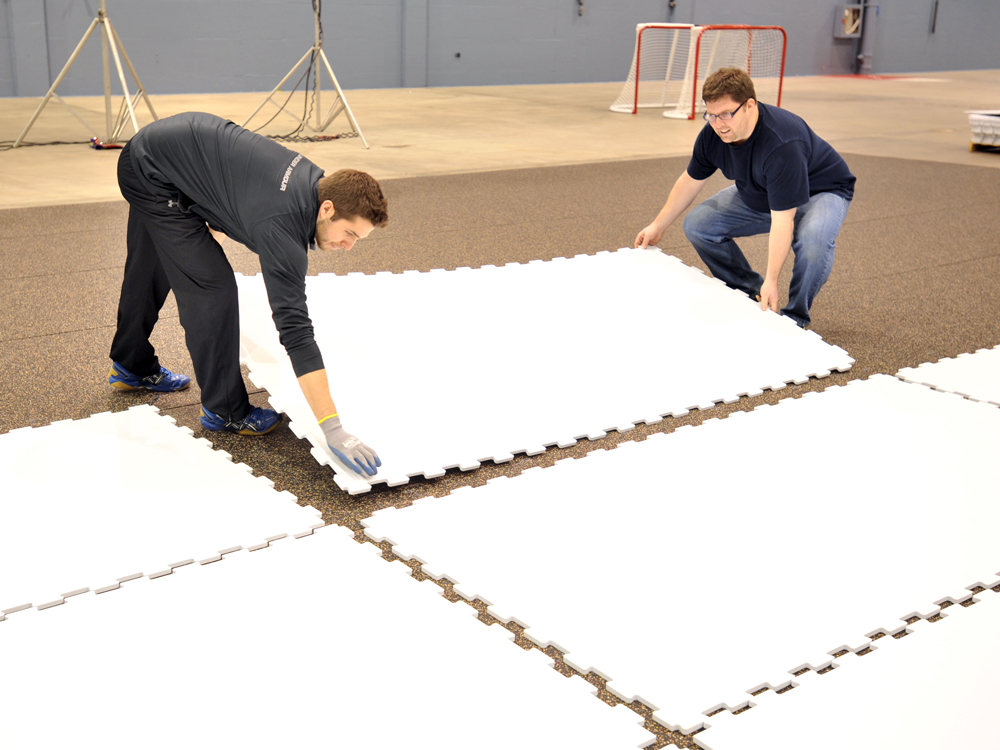 probably will be needed to carry and position each tile. The 4’x4′, 3/8″ thick tiles weigh 31 lbs. each; the 4’x8′ tiles weigh 80 lbs. each for the 1/2″ thickness, and 120 lbs. each for the 3/4″ thickness. Still, it’s not a terribly difficult installation process; expect it to take 1-2 hours, possibly longer for a larger commercial installation.
There are some things to be aware of for both the Revolution and Extreme Glide tiles. First, the toe picks on figure skates will damage the tiles. Second, because of the higher friction levels compared to real ice, skates will need to be sharpened more often than when skating only on real ice. These same points also hold true for most varieties of synthetic skating tiles in general.
Cost
Now we’re getting to the important part, right? There’s some good news and bad news when it comes to the cost of synthetic skating tiles, whether from HockeyShot or anywhere else.
The bad news is, they aren’t cheap! You can check the latest prices for the Extreme Glide tiles here, and for the Revolution tiles here. Keep in mind, there sometimes are volume discounts available.
HockeyShot recommends having enough tiles for at least 200 square feet of skating surface, which I think makes sense. Otherwise there’s not enough room to make it worth being on skates. Obviously a bigger skating area will allow players to work on more aspects of the game, but 200 square feet is enough to be very beneficial.
The good news is that depending on the situation, investing in skating tiles may be a better financial decision over the long run than other approaches to training. I discussed this in my earlier post about synthetic ice for skating.
The Choice
Ultimately, the question of which, if either, of the two types of HockeyShot synthetic ice tiles is better for you depends on your own situation. For people who are looking to get the most bang for their buck when it comes to hockey training, I suggest crunching the numbers in a similar fashion to what I did with a hypothetical example in my other post about synthetic ice. Be realistic about how much you will spend on sticks and pucks sessions and the related costs, and try to forecast that over a few years. If you don’t think you will spend as much as you would on the skating tiles, then that is your answer.
That being said, if the numbers indicate that skating tiles are the smarter approach financially, or if the financial aspect isn’t the be-all and end-all (i.e., you’re willing to spend more for convenience, coolness, etc.), then you still need to assess your situation to decide between the Revolution and Extreme Glide tiles.
The Revolution tiles are less expensive per square foot than the Extreme Glide tiles (in any size or thickness). They also are more versatile in terms of being easier to disassemble, store, or reconfigure. And, they can be installed on a slightly uneven surface.
The Extreme Glide tiles provide a slightly better skating experience. They also have a longer lifespan, which, if both products are used to their full expected lifespan, makes them more cost-efficient than the Revolution tiles.
There are lots of things to think about for anyone considering investing in synthetic ice tiles. I hope this post has provided you with the information you need to move forward in the direction that’s best for you.
And now, I’d like to hear from you! Do you have experience with either line of HockeyShot skating tiles (or any other brands)? If so, what was your experience like? Please share your opinions, and of course if you haven’t skated on synthetic ice, please share your questions!
This is a very informative comparison. It never occurred to me to consider synthetic ice tiles, but now I’m intrigued and will think about it further.
Hi Rebecca – That’s great, I’m glad this was useful for you, and if you do get some tiles, please send an update and tell us!
have you tried/ considered the Glice panels?
would be very interested to see if you have an opinion, given the price differential
Hi Tony,
I haven’t tried Glice, but from what I’ve read and heard it sounds like it’s one of the best synthetic ice products available in terms of performance. As you say, though, it is more expensive than many others. I may do a review of Glice products at some point; if so, I would of course include pricing details.
Hey there,
I know this is several months after your review, but in this quarantine time I m looking to get a small synthetic ice patch to keep in shape and keep up my technique. I was wondering if you have any feedback regarding how well goalie pads slide on this material? I am a goaltender and want to work on my lateral movement, if these don’t slide well I don’t think they would be of much use to me.
Hi Mike,
The pads won’t slide as well as on real ice, unfortunately. HockeyShot recommends goalie pad sleeves, which they sell. They’re basically fabric sleeves that fit right over the pads and let you slide easily on the synthetic ice. Hope this helps!
Would you suggest getting these during this quarantine? My son is 9 years old and with tryouts eventually coming once COVID-19 is behind us.
How often would your skates need to be sharpened? Where do you get them sharpened with no rinks or hockey stores open?
Both hockeyshot synthetic ice options are expensive, so a sparx sharpener gets added to the costs then?
Thoughts?
Hi Jason,
You’ll definitely need to sharpen skates more often with synthetic ice. Just how much more depends on who you ask, but I think twice as often as with real ice is a realistic expectation. It also depends on the kind of skating. If someone is using the synthetic ice more for stickhandling and shooting while in skates, but isn’t really digging their blades in and skating as hard as they might in a normal practice on real ice where they’re doing stop and start drills, then the difference in sharpening frequency might not be as great.
Your point is right on, though – how to get them sharpened when you do need it? I can relate to what you’re saying about wanting to be ready for tryouts. My son’s (10) tryouts were originally scheduled for this week (now postponed indefinitely, of course). Both he and my daughter had been doing some skating work at the rink before things started shutting down, so now he’s just focusing on doing whatever he can off the ice to be ready. Stickhandling and shooting practice in the driveway, mostly, but he said he also wants to start doing some dryland stuff that will help his skating, like sprint starts and foot speed drills.
I can’t really give you an answer on whether you should invest in the synthetic ice (and possibly a Sparx sharpener), but I would say that if you don’t think you would use it much once life gets back to normal, then I can’t see how it would be worth the cost for this relatively short time.
The other thing to consider as far as that goes is that just about everyone else will be in the same boat when tryouts do take place. Meaning that other kids won’t have been able to work on their skating either, so while your son may not be able to advance his skating ahead of other kids during this time, he also isn’t likely to lose ground either. I guess the only way that kids might be able to make big improvements in their skating during isolation is if they have synthetic ice. I only know of one kid in my son’s age group and organization that has it. There may be more, but it’s still pretty rare where we live – by comparison, I know of several families that build backyard rinks. And those have been melted for a while now around here.
Anyway, I hope this helps a bit. The uncertainty definitely makes decisions about stuff like this more difficult – let me know what direction you end up going. And, good luck to your son at tryouts, whenever they do finally happen!
We have the Revolution tiles on a 12×24 surface. I have two kids – one a player, one a goalie. My player finds that the tiles build good strength since they require a bit more push to skate on. Puckhandling is excellent. We have found that compared to approx 5 hours of ice time for regular ice before skate sharpening, we get about 3 on the synthetic which is really easy to hit when it’s at the house so we also invested in a Sparx sharpener – love this machine too. The time it saves us not having to drop off skates is so worth it, especially if my goalie hits a post. In regards to goalies and slides, even with the recommended pad covers, they are difficult to do well. But T-pushes, butterflies etc are fine. Overall, we have found the tiles well worth the price point, easy to install and super durable. Hope this helps with some alternative feedback!
Hi Karen,
This is great info, I’m sure this will be useful to other readers that might be researching tiles (and the Sparx sharpener). Thanks for sharing – hope you’ll come back to the site often.
Jordan
I got a small area of the revolution tiles (about the size of a crease). They’re set up in the garage which has a tile floor and I got mats to put them on so they wouldn’t slide around. The mats helped a little bit, but the tiles still slide a little, so I taped the corners down with Duck tape. I don’t skate on the corners so it wasn’t an issue, but the tape stretches and the tiles still move (barely but they move and it isn’t ideal). I’m trying to fix it but I can’t figure it out. Any suggestions?
Good question. What kind of matting do you have underneath the tiles – is it rubber, or some sort of fabric? I know that the manufacturers recommend a thin (+/- 2 mm) rubber matting. I’m thinking something similar to the grippy mats that keep rugs from sliding on wood floors would work. If that sounds like what you are already using, it may be that since you have a small area of freestanding tiles that don’t extend all the way to the walls, even when locked together as one surface it’s still relatively light, so it may be impossible to completely eliminate movement.
If the matting you’re using now is different from the kind the manufacturers recommend, it might be worth switching that out to see if it improves things. Again though, with a small area of freestanding tiles, especially if your garage floor itself is tile (not sure if you mean ceramic or linoleum tile, but either probably is more slippery than concrete, etc.), I don’t know if there’s a way to make it perfect.
The only other thing I’d mention is that if there’s any chance that you’ll add more tiles down the road, I would remove the tape and clean the area where it was contacting the tiles so you don’t have issues skating on it later.
Please let me know about your current matting, and if you change it whether that makes a difference. Good luck!
I have rubber mats. The same type of mats in a locker room or a gym floor
Ok – normally I would think that those would work as well as anything. I do still wonder if the thin grippy mats might hold the tiles a little bit better, but that’s mostly because the manufacturers recommend that kind of mat, so I figure they wouldn’t recommend it if other kinds worked better. But, it’s possible they could work as well; you could change to the thin mats and still have the tiles slide a bit, so it depends if you want to take the chance of swapping the mats out for potentially no change re: sliding.
One other thought I had is that maybe you could brace the section of tiles against the walls. Since the problem is that the tiles are sliding on top of the mats, not that the mats are sliding on the floor, the bracing idea would only work if the edges of the tiles were exactly lined up with the edges of the mats. But if that’s the case, it might be possible to use 2x4s between the mats/tiles and the garage walls to keep the tiles from moving.
I hope this helps.
I’m thinking of ordering these for our garage. We have two young players, one who is very dedicated and probably would use this daily. I’m wondering about how much floor space would be worth dedicating to it and if one or two packages would be sufficient (1 pack is 18’x18″ tiles x 10).
How much floor space would current users recommend.
Thanks!
Hal
Hi Hal,
Great question, and I’m hoping that some other readers who own the tiles can chime in here. I’ve used the tiles, but don’t have them in my house, so folks who do and have experience with them over a longer period can probably give you great feedback.
That said, there are a couple factors to think about when deciding on how much square footage (and what configuration) to get. For any other readers that are responding, if you can give a little info on how these relate to your experience with the tiles, I’m sure that would be helpful – thanks!
1. Space available: Is it a one- or two-car garage? Make sure you leave enough room to allow access to other stuff you keep in there without having to clean the tiles every time (e.g., dust and grass clippings that get shaken off the lawnmower whenever you bring it in or out of the garage). If it’s a two-car garage and you park a car on one side, will you want a barrier to keep errant pucks away?
2. Ways used: Are the kids going to use it to work on skating, or just for stickhandling and shooting work? If it’s the latter, then even if they have skates on, they won’t need as much space – I’d think two packages could be enough depending on how old/big your kids are, though even if they’re small it might only be enough space for one kid at a time in skates. If they want to work on actual skating, then you’d need a lot more square footage. I think to work on explosiveness and starts/stops would require 15 feet in length, but less width; for crossovers, you’d probably want 15 feet (or more) in both length and width.
I hope this helps a little bit, and hopefully other readers can share their feedback too – please keep checking back!
Thanks,
Jordan
How long does it take for the white particles to stop shredding. My kids love them, but I had no idea the mess that they would make. How long does it take for them to stop shedding so much? It’s beyond frustrating. Thanks! #HockeyMomof3Boys
Hi Monica,
I don’t think they’ll stop producing shavings. I talked to a couple people that have had tiles for a while, and they thought it had decreased slightly over time, though one did say that might just be her imagination when really she’s just more used to it.
My suggestion, if you’re not doing this already, would be to get the kids involved in sweeping or vacuuming up the shavings after they skate. They could take turns being the “Zamboni” the same way they would need to shovel snow off a backyard rink, except it’s not nearly as tiring.
I know this isn’t the perfect answer, but I hope it helps a little bit.
Jordan
Hi all, great article by the way! I’m trying to predict the possible shut down of ice rinks in our area with the next quarantine. Considering a 9′ or 10′ X 10′ sq ft area for my 8 yr old. I know it will differ for most kids but any thoughts on that amount of space. I’m trying to eyeball how it would look and it seems decent for at least some sharp turning, stick handling, and shooting. But would love to hear opinions.
Thank you!
Lance
Hi Lance,
Thanks, I appreciate it!
Hopefully other readers will add their thoughts, but I think for skating work you would want to have a little more square footage. HockeyShot’s recommendation is at least 200 square feet. You might be able to get by with a little less for a young kid, but that limits what he’ll be able to work on.
That said, if you have room to add on more tiles, you could start with 10’x10′ and expand later. With 10’x10′, I think even at your son’s age the only skating he’ll be able to work on is tight turns, and even those at a slower speed. But he definitely could work on shooting and some stickhandling in skates, which (especially for shooting, in my opinion) is very useful.
I hope this helps – readers, please share your perspective on this!
Thanks,
Jordan
Hi is this ice good for goaltenders to practice on. What is the sliding factor like? Would pads stick this surface or slide. Thanks ,Mike
Hi Mike,
HockeyShot sells fabric sleeves that go over goalie pads to help with sliding and protect the pads. Another reader said even with the pad sleeves, her goalie son finds that he can’t slide as well as on real ice, but has no problems with T-pushes and butterflies.
I hope this helps,
Jordan
Hello,
Have you had any problems with your surface bubbling and after the surface has bubbled, the top layer starts to peel off where the bubble was? Not the normal plastic shaving shedding but the top layer is actually peeling off of the tile…Is this normal? These were just installed on Christmas Day and my son is 7 and weighs 50lbs.
Thanks!
Hi Sabrina,
No, I haven’t seen or heard about that happening before. It definitely doesn’t sound normal. I would recommend contacting HockeyShot (or whichever manufacturer and/or vendor you purchased from if not HockeyShot) and asking them to resolve it. Make sure to keep a paper trail of everything (including follow-up emails to recap if you talk to them by phone), just in case there’s any disagreement about what was said.
I’m really sorry this happened, and I hope the vendor has a good solution. Please let us know how it goes.