It’s still August, and winter seems a long way off. At my house, like many others I’m sure, the hot commodity right now is sunscreen, not hockey tape. So, if a post about how to build a backyard ice rink seems a little premature, I get it.
Technically we have another four weeks of summer left, and we may even have beach-worthy weather for that whole time. But let’s face it, Labor Day weekend is the unofficial start of fall. Between everything associated with the start of a new school year, the start of a new hockey season and other fall sports, leaf raking, and more, fall is a busy time.
Not that it’s any more hectic than other seasons, but if you want to build a backyard rink, you might need to convince your spouse or your parents that it’s worth doing. That could involve more than one conversation spread out over several weeks, or even months. And, since building a backyard rink does require a bit of planning and some materials (especially if you haven’t done it before), I wanted to give you plenty of time. You can thank me later. 😉
Note: As an Amazon Associate, I earn from qualifying purchases.
Will It Work In My Yard?
The first thing you have to do if you want to have a rink in your yard is figure out if it’s actually feasible. The biggest factor in that is the  slope of your yard.
One thing to understand is that you should aim for an ice thickness of at least 4″ in your rink. Since almost no yard is perfectly level, that means that your ice will be thicker at one end of the rink than the other. That’s fine, but the more slope you have from one end to the other, the more potential there is for problems.
A good rule of thumb, especially if this is your first time building a rink, is to set up your rink so that the slope from one end to the other is a maximum of 6-7″. Say you have a slope of 6″; that means your ice would be 4″ at the shallow end, and 10″ at the deep end.
A Few Other Requirements
Besides making sure that your rink area doesn’t have too big of a slope, there are a few other things I should mention that probably won’t be relevant, but they’re worth noting because if any one of them does come into play, then you’ll need to find a different site for your rink. Here are those things to consider.
- Make sure you don’t build your rink over a septic tank or leach field.
- Make sure it’s close enough to a water spigot and that you have a long enough hose to reach the rink to fill it.
- The same goes for electrical outlets and extension cords, if you want to set up lights for night skating.
Calculating the Slope
The first thing you’ll do when calculating the slope is to mark off the site of your rink. Once you decide roughly where you want it, you should be able to see which corner is the highest. This will end up being where the ice is thinnest (again, though, at least 4″ thick). Pound a stake in at this corner.
To make the process easier, especially if you’re measuring the slope by yourself, I’d recommend marking and labeling all your stakes at 1″ increments. After you put in the high-corner stake, measure off the dimensions and put in stakes at the other corners. You should measure again as you go each time you add a stake to make sure your dimensions aren’t off.
Once you have all four stakes in and you’ve confirmed the dimensions, go to your high-corner stake and tie one end of a spool of string to the stake, exactly 4″ off the ground. You can also put an eye hook into that stake 4″ above the ground and tie the string to that. This definitely makes it easier if you’re working alone, but even if not.
Then go to one of the other stakes and attach the string so it’s taut. If you’re working alone, you might want to attach eye hooks or screws, at 1″ increments, to the three stakes that aren’t at the high corner. In any case, once the string is taut between the stakes, take a line level and attach it to the middle of the string, halfway between the two stakes. Keep adjusting the string at the non-high-corner stake, moving it up or down as needed until the line level shows that the string is level.
When the string is level, measure how high off the ground the string is at the non-high-corner stake. Let’s say it’s 8″ off the ground. Since your high-corner stake was 4″ off the ground, that means the slope between those two corners is 4″ (i.e., 8″ minus 4″).
After writing down the string height for this corner, repeat the process for the remaining two, running the string from the high-corner stake to each of them and writing down the string height for the last two stakes that made the string level.
What Does the Slope Tell Me?
As I said earlier, the slope is the biggest factor in determining whether you can successfully put a rink in your yard. If your slope is 6-7″ or less, then congratulations – you can build a rink! Assuming you can convince anyone else in your house that might need to be convinced, of course.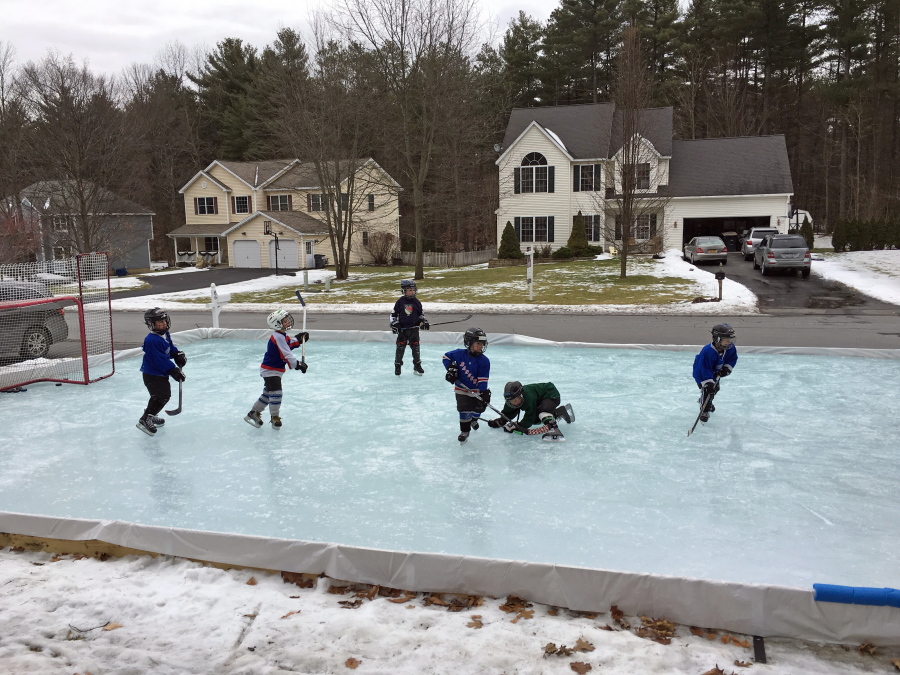
If your slope is more than 6-7″, take a look at your yard and see if making a slight change to your rink site – either by making it smaller, or simply changing the angle or placement – could give you a smaller slope. Sometimes making a rink just a few feet shorter or narrower can be the difference. You would need to go through the measurement process for the new rink footprint to find the slope again, of course.
Some people build rinks with slopes greater than 6-7″, so it’s not impossible, but it means you’ll need more bracing for the boards at the deep end, you might need taller boards and a bigger liner, and you’ll also need a longer freeze period, which may not be realistic depending on where you live. So, while it can be done, my recommendation, particularly if this is your first rink, is to not build a rink on a site with more than 6-7″ of slope.
Living In A Material(s) World
If you live someplace with really cold winters, it might be possible to build a rink just by building snowbanks around the perimeter, packing them down until they’re solid, and then flooding inside the snowbanks. But for the vast majority of us, we’ll need a few materials – namely, a liner, boards, and bracing. There are lots of options for each, so I’ll walk through some things to consider.
Liner
The liner is made of plastic and is available in different thicknesses. Since a puncture or tear can ruin your rink-building efforts, I think it’s better to go with at least the medium thickness available (6 mil), unless you’re building your rink on a perfectly flat and smooth surface, like a tennis court.
You want your liner to be white, not blue or black, as those colors will attract heat and warm up the ice. It should be bigger than the dimensions of your rink, because you’ll need to extend it up the insides of the boards and over the top. The last point on liners is that you want one liner; don’t try to combine two sheets and tape them. There’s still a chance that it will leak, and it’s better to avoid that risk.
Boards
You can make your boards out of plywood (3/4″ is recommended), 2×12 (or 2×15, etc.) lumber, or manufactured boards from various suppliers. The thickness of the ice combined with how tall you want your boards to be above the ice surface will determine if the 2x lumber is a viable option.
Plywood boards can be cut to whatever height you want, and are inexpensive, but they aren’t as durable as the other types. The manufactured boards are high quality, built to last, but of course they will cost you more.
Bracing
Again, there are lots of different options for bracing. Some people make their own triangular brackets out of 2x lumber that can both connect the sections of boards and be staked into the ground to act as bracing. Others use wooden stakes, rebar, etc. There are also rink-building kits that include pre-made brackets, and you can buy more separately if you need them.
Regardless of the type of bracing you go with, the crucial thing with bracing is to have enough of it. That means at least every four feet along the boards; if you have deeper water – say, a foot or more – do every two feet. Better safe than sorry.
Other Materials
We’ve covered the necessities, but there are other materials that you might want to consider depending on how your rink will be used. Lots of people put foam bumper caps (they basically look like pool noodles) on the top edge of the boards for safety. This is a good idea if you’re using plywood boards, and/or if young kids will be using the rink.
You might want some lighting for nighttime skating or maintenance. You can take care of this pretty easily with a couple work lights from a hardware store, or string up strands of lights if you want more ambience.
Preparing the Yard
First things first… I should mention that the yard prep and frame build should be done on the same day. Also – and this is important – you should build the frame before the ground freezes. Otherwise, you’ll have a tough time getting your bracing into the ground.
After you plot out your rink site as outlined earlier, it’s ideal if you can leave the stakes in so you know exactly where to build your frame. If it’s going to be a while between when you measure and when you build (and that’s usually the case), then you’ll want to make notes of where each corner is (e.g., “high corner is 15′ left of NW corner of patio”) so you’ll be able to build in the exact same spot when the time comes.
Rake the rink site thoroughly so there’s nothing that could puncture your liner: twigs, rocks, wood chips, pine cones, etc. Once that’s done, put in your four corner stakes, then measure diagonally in an X pattern to make sure you have a rectangle with four right angles.
After that’s all good, tie string between the stakes around the perimeter. Then use spray paint to paint the string from directly above. The paint will mark the perimeter on the grass, and then you can take out the stakes and string.
Building the Frame
These instructions are for people who are using 2x lumber or plywood for their boards. If you are using manufactured boards, or your own boards but with a kit that provides brackets, then you will just need to follow the instructions provided by the manufacturer.
To follow these instructions, you’ll need the following:
- A cordless screwdriver.
- At least four L brackets (you might be better off with eight, depending on the height of your boards).
- Small metal mending plates to connect the boards together. How many mending plates you need will depend on how many boards you have.
- Bracing. As I mentioned earlier, you can use rebar, 2x lumber, or wooden stakes.
- A mallet or sledgehammer to pound the bracing into the ground.
- Screws to go with the L brackets and metal plates to connect the boards. Make sure the screws you use aren’t so long that they will go all the way through the boards. If the screws break through to the inside of the boards, they’re a safety hazard, and will puncture your liner.
To start, lay your boards around the perimeter. Go to a corner and attach two corner boards with an L bracket. Then work your way along one side, using the plates to connect the boards. Make sure to stay in line with the painted outline on the grass.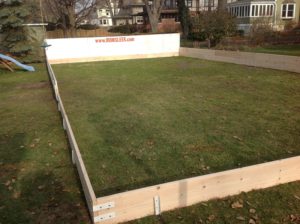
After you finish one side, your helper can start putting in the bracing on the side you finished. Make sure to put a support at least every four feet along the boards, and drive them at least one foot into the ground. The top of the support should be level with the top of the boards, or maybe slightly below. Once all the supports are pounded in, walk around the inside of the boards and push out on them to check for movement; if there is any, add additional supports.
Line and Fill
After the frame is in place, you might have to wait before you can put in your liner and fill the rink with water. Watch the weather forecast; you’ll need at least 3-5 consecutive days when the temperatures are right around freezing or colder during the day, and below 25 degrees Fahrenheit at night.
When it looks like the weather conditions are in your favor, it’s time to put in the liner. Before that, though, do another thorough check of the ground and remove anything that could puncture the liner.
Also, get down on the ground and check all around the rink frame for gaps between the bottom of the boards and the ground. If you find any that are big enough that you can fit your fingers under the boards, fill them in with dirt and pack it in really well. This will keep the liner from being pushed out under the boards and possibly puncturing when you fill it with water.
After you’ve done those last two things, take the liner to the center of the rink and start unrolling it, keeping it centered and properly oriented. Roll it out so it’s flush against the ground, all the way to the edges of the boards, then up the boards and over the edges. You can use binder clips, or foam bumper caps if you have them, to secure the liner at the top of the boards; make sure to allow plenty of slack when you do this.
Once the liner is in place, run the hose to the rink and start filling! The rink should be filled all at once; don’t fill it in a couple inches, wait for it to freeze, and then try to fill in another couple inches. This can melt a hole in the existing ice, allowing the water to run underneath the existing ice sheet. That would force the ice up, which could cause tears in the liner.
The filling process takes a while, so obviously you probably won’t sit and watch the entire time, but you should keep an eye on things. If the boards look like they’re bowing outward, hammer in another support (use rebar if the ground is frozen). If the liner is being pulled off the boards toward the center of the rink, take off the binder clips and let out some more slack in the liner so it’s flat against the boards, then put the clips back on.
You have nothing left to do after filling except let the weather do its work. Well, you should try to make sure that no animals, leaves, tree branches, etc. get in the water. Otherwise, though, it’s just a waiting game.
The Big Decision
So, now that you know how to build a backyard ice rink, you have to decide – is it worth it? Only you can answer that question based on your own unique situation. The financial costs can vary widely depending on the size of the rink, what kind of boards are used, and other factors. It’s possible to build a perfectly good backyard rink for just a few hundred dollars, or go all out and spend several thousand.
While there is some hard work involved, it doesn’t seem that bad if you have one or more helpers, and if you don’t push your luck in terms of terrain, materials, or weather. Have a big slope and didn’t add extra bracing at your deep end? Try to skate before the ice has had sufficient time to freeze? You probably won’t like how things go.
But if you do things the right way, and the weather cooperates, what I can tell you – and what just about anyone who has built their own  backyard rink will tell you – is that the memory of the time and money that went into creating the rink won’t last nearly as long as the memories that it will create for you. Having kids-only or grownups-only pickup games, hosting a nighttime neighborhood skating party, or just waking up early to have the ice to yourself.
You can probably tell how I feel about backyard rinks. Now I want to hear from you! Have you ever built, or skated on, a backyard rink? What are some of your memories? If you have wanted to build a rink in your yard before but haven’t done it yet, what were/are the things that made you decide against it?
Please share your questions, comments, and stories below – thanks!
Note: This post contains affiliate links. If you click on an affiliate link and subsequently make a purchase from the linked website, I may receive a commission. The reviews and recommendations on this website are based on my own personal experience and research, and are not influenced by my affiliate status. I will always give my honest opinions to help you make informed decisions.
This is a wonderfully informative post. Yes, it is still summer, and as I am in AZ, I will never have the opportunity to build a rink in my backyard. However, a native of Toronto, I know the joys winter can bring; namely snow and hockey.
Infact, my annual visit to Ontario happens during the winter. For the last three years, my uncle has had a rink set up in his backyard before we arrive for our visit. He has learned something new every year he sets it up and he gets better at it each time!
The rink provides a great activity for family, guests, and neighborhood kids! Yes, even the kids you may not want in your backyard every day! Joking! Anyway, thank you for the detailed instructions. I would love to see some pics of your rink!
Hi Ashley,
That’s awesome that your uncle builds a rink! I agree, there’s always some new aspect to learn that makes the rink better. Thanks for checking out the site, and for your comment – hope you’ll come back again.
Jordan
I did a 24×48 rink last year with a slope of over 20″ and it was great! I probably went overkill on the bracing and boards but the rink held up all winter and was one of the best people have seen. So dont let the slope discourage you…like life, it might be a little more work sometimes but it’s always possible. Good luck and happy skating.
That’s awesome – thanks for sharing Jay!
We’re looking to build a rink in the local park and would be faced with similar circumstances. The local township is willing to put up the boards but the best area we can find has a 17″ slope with a 24×48 rink. We can reinforce the boards at the deeper end but I’m concerned about the ice being able to freeze properly with that much water. We are in south-western Ontario where winters tend to be very up and down temperature wise and long periods of consistent freezing temperatures seem to be few and far between. My question is are we wasting our time?
Hi Paul,
Tough to say for sure. Obviously it can work if the weather cooperates. And it could even be feasible if you have a few freezing days, then a slightly warmer day, followed by a few more freezing days. It takes a little longer, but “two steps forward, one step back, two more steps forward” might be the only way to get a full freeze at the deeper end. Just make sure to keep people off the ice until it’s completely frozen, as a break through the ice will set you back more time.
I’ve heard some people talk about another way to deal with a larger slope. I’ve never done this myself, so I’m not 100% sure how well it works, but what some folks do is build up the height of the lower end, usually before putting down the rink boards. There are different ways to do this, but typically soil is dumped and packed down so there’s a firm foundation. With really big slopes, I’ve also heard of people actually placing unopened bags of soil at the lower end to do most of the height buildup, then covering with more loose soil to smooth out the surface so the tarp doesn’t get pushed into the cracks between the bags of soil.
Since you’re doing it at a park, I don’t know if the township would go for having all that dirt sitting there after the season. But, maybe it would help with reseeding in the spring. If so, it could reduce the slope and make the rink-building process easier in subsequent winters. Again, I haven’t done this myself, just thought I’d mention it as a possibility.
If any other readers have experience with building on a slope and can help out by sharing info (about slope size, freeze time, etc.), I hope they’ll chime in.
Thanks for reading Paul. Sorry I can’t give a definitive yes/no answer on whether it’s worth building, but hopefully this is some help. Please let us know what you do and if you do build it, how it goes.
Jordan
I’ve been building a 20×40 rink for the last few years. It’s 18″ deep in the deep end, and 3″ in the shallow end. Once the ice locks up it’s fine for the season, but I wait until it’s really cold before filling it, and then give it a good 2-3 days before using it.
Hey mike
Any advice on building one on pavers? Does this make it more difficult? In the process now making one
Would you be able to share how you made the rink with such a large slope? If you have pictures that would be great. We have a huge slope as well are trying to determine what is the best strategy.
Hi Jordan! We have a 6″ slope for our rink but our boards are tall enough to accommodate. I flooded about 5″ on the lowest end so 11″ in the deepest. We’re on day 2 of a 5 day freeze here (Toronto Canada). Unfortunately one of the corners had some wood on it and it cracked the top layer. Does this set us back a lot? It seems to have a top layer of 1.5″ already.
Hi Mark,
First, I apologize for the slow response – I must have missed the new comment notification somehow.
My answer is a little late, but in any case, I think with 3+ days of freezing temps left, you could recover. Especially if the crack is isolated to the corner (ideally it’s one of the corners at the shallow end), and even more so if the temps are especially low. Please let me know how it turned out – hopefully it’s frozen solid and you’re enjoying it.
Thanks for reading, and Happy Holidays!
Where do you recommend getting a liner from?
Check hardware stores, but if they don’t have what you need, there are lots available online – here’s one. https://amzn.to/3570U6o
Hope this helps!
Great advice!! I just don’t have the yard for it.
Thanks for reading Amy!
Hi Jordan,
thank you for your great instructions for building a backyard ice rink. In Germany we´re in a national lockdown due to corona pandemic. My son and I are icehockey players and our training/league is stopped since 31th of October 2020. 🙁
The only thing I could do, to stay in shape without loosing our icehockey skills, was to create an own rink in the backyard. And we did it! Just like in yours instructions.
We could skate three weeks. I also built a small ice refsurfacer and when my son told me the ice is as smooth as in our professional hockey arena, I was very proud. 🙂
The rink is equipped with 9500lm LED floodlight and we organized three times a small ice party with disco lights and music for us and the neighborhood kids.
It was a lot of work, but it´s definitely worth it and I was the hero in our village.
We´ll never forget this amazing feeling, skating on an own ice rink in the garden.
Thanks a lot from Germany (Bavaria)
Hi Markus,
Thanks for your note, I’m really glad you found my post helpful. The skating parties sound awesome! Congrats on the success with your rink; now that you’ve done it once it’ll be easier next time. I hope you and your son are able to get back to playing under normal circumstances again soon.
Jordan